
omtech recommended upgrades, omtech laser recommended upgrades, Monport recommended upgrades, Monport laser recommended upgrades, chinese laser recommended upgrades, laser recommended upgrades, recommended upgrades, custom woodworking, woodwork, custom, omtech, monport, light object, laser, discount code, chiller, air assist,recommended,co2 lasers,co2 laser, fiber lasers, fiber laser, laser software, laser programs, laser computer programs, laser inline fan, inline fan, chinese laser inline fan, inline fan upgrade, setup co2 laser,co2 laser setup,co2 laser setup instructions, setup instructions,co2 laser focus,co2 laser auto focus,co2 laser manual focus, chinese laser auto focus, chinese laser manual focus, af, mf, omtech discount code OEADESIGN5off,omtech promo ,code OEADESIGN5off,omtech coupon code OEADESIGN5off,omtech laser discount code OEADESIGN5off,omtech laser promo code OEADESIGN5off,omtech laser coupon code OEADESIGN5off,monport laser discount code, monport laser promo code, monport laser coupon code, monport laser discount code, monport laser promo code, monport laser coupon code, Light Object discount code OEADESIGN, Light Object promo code OEADESIGN, Light Object coupon code OEADESIGN, Light Object discount code OEADESIGN, Light Object promo code OEADESIGN, Light Object coupon code OEADESIGN, lasers123, laser123, laserguys, laserguy, omtech official, official omtech, omtech cam edmonds, omtech brandt, bearded builds, bearded builds workshop, omtech josh wright, josh wright, omtech facebook, omtech uk, omtech united kingdom, omtech cad, omtech canada, omtech ca, spetool discount code, spetools discount code, laser-guys, laser-guys.com, laserguys5off, c02 laser user guide, setup co2 laser, Preenex, Aeon, Glowforge, Thunder Laser, Boss Laser, HL-Yeah, Monport, ruida, Ruida Controller
Please Support us by using our exclusive 5% OFF DISCOUNT CODE OEADESIGN5OFF at www.OMTechlaser.com
Or shop through the affiliate links provided — it helps us keep creating valuable content for you. Thank you for your support!
Software
-
To use your machine you will need appropriate software capable of the following
1. Drawing or editing designs and has the ability to save or export files in .svg, .dxf, ai, etc. formats
2. Communicating with the laser controller
-
Popular Software
-
Lightburn
-
Is the most popular software for laser users
-
Has design capability and communicates with the laser controller
-
Provides a free 30 day trial which can be downloaded from the Lightburn website (see links below)
-
Compatible with both PC and MAC
-
License is good for life, but it only includes one (1) year worth of upgrades. Since the license is good for life you may continue to use your license after the initial one (1) year is expired. However, in order to continue to receive new updates you have to renew the license (I am told if you skip a year and decide to upgrade you have to pay for the year missed too).
-
-
RDWorks
-
Has drawing capability and communicates with the laser controller
-
Is free through the OMTech website or link below
-
Peer support is more limited since it is not as popular.
-
Is much more limited than Lightburn
-
Compatible with PC only.
-
-
Inkscape
-
Is a free graphic design software for vector illustration, layout, photo editing, etc.
-
May be preferred for design over Lightburn as some find it more user friendly for this purpose
-
Does not communicate with laser
-
-
CorelDraw
-
Is a graphic design software for vector illustration, layout, photo editing, etc.
-
May be preferred for design over Lightburn as some find it more user friendly for this purpose
-
Does not communicate with laser
-
-
Adobe Illustrator
-
Is a graphic design software for vector illustration, layout, photo editing, etc.
-
May be preferred for design over Lightburn as some find it more user friendly for this purpose
-
Does not communicate with laser
-
-
*I personally use Lightburn so that will be the focus of the discussion below.
Options for Connecting to Laser
-
USB Cable
-
Most machines come with a 10ft USB Type-A to USB Type-A cable
-
This is the easiest method, especially when first getting set up and familiar with your laser.
-
You have to have a computer in close proximity to your laser as you are limited by the length of a USB cable
-
Simply plug one end of the USB cable into the USB port on your machine, plug the other end into your computer.
-
Note: you may need to get an adapter depending on the ports available on your computer.
-
-
Step by step instructions to setup your controller via USB can be found here
-
Video instructions to set up your controller via Ethernet can be found here
-
-
Ethernet
-
Most machines come with an ethernet cable.
-
This method can be more difficult than using a USB cable.
-
Ethernet cable can be as long as you want with good reliability.
-
Plug one end into the ethernet port on your machine. Plug the other end directly into your computer, Wi-Fi extender, or router.
-
Requires setting up an IP address. Directions on how to do so can be found here.
-
Step by step instructions to setup your controller via Ethernet can be found here
-
Video instructions to set up your controller via Ethernet can be found here
-
-
Lightburn Bridge
-
Requires the purchase of bridge kit from Lightburn.
-
Allows full Wi-Fi connectivity without the need for an ethernet cable
-
Intended users without USB connectivity, but works equally well for all Mac, Windows or Linux users.
-
Lightburn Bridge can be purchased here
-
Step by step directions to setup the Lightburn bridge can be found here
-
Video instructions to setup the Lightburn bridge can be found here
-
Installing Lightburn & Setting up you Controller
1. Download & Install the appropriate version of Lightburn from their website here
-
Lightburn may ask Windows users if you want to install the USB/FTDI serial driver. You will need to check the box to have it installed. If not your computer will not communicate with the controllers without this driver.

2. Turn your laser on and note which corner the laser nozzle travels to upon startup. You will need this information later
3. Once Lightburn is installed you will be prompted to add a laser.
-
The "Devices" pop up will appear.
-
If you have connected via a USB cable be sure your laser is turned on and choose "Find my Laser". Double check you have a good USB connection and click "Next" on the warning screen.
-
If you connected via Ethernet choose "Create Manually"

4. If you are connected via Ethernet skip to step 6. Otherwise, if you are connected via USB ensure you have a good USB connection and click "Next" on the warning screen.

5. Lightburn will connect to your controller and display the "Device Info". Choose the appropriate device. I use the "Packet/USB" connection type, then click "Add Device"
-
If you have connectivity issues after successfully adding the device you can always switch to the other option by clicking on the "Devices" button in the "Laser" window on the right hand side of the main screen

6. You will now be prompted to choose your controller
- Most OMTech machines come with a Ruida controller. If this is the case, choose "Ruida"

7. Lightburn will now ask you how your would like to connect.
- For USB connection choose "Serial/USB"
- For Ethernet connection choose "Ethernet/UDP"

8. If you are connecting via Ethernet you will need to enter the IP address of your laser.
- If you are connecting via USB please skip to the next step

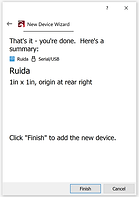
9. Lightburn will then ask you to name your connection and the dimensions of your work area.
- Choose whatever name you would like and enter it into the textbox where "Ruida" is shown below.
- For the dimensions of the work area enter the following; being certain to use appropriate dimensions. The screenshot below shows inches but most new installations will default to mm
- For the "X Axis Length" enter the dimension of your bed width (left to right). For a 20x28 this will be 28 in (711.2 mm)
- For the "Y-Axis Length" enter the dimensions of your bed depth (front to back). For the 20x28 this will be 20 in (508mm)
- If you don't know the size of the bed or you inadvertently enter the wrong size you can always edit it after the fact by clicking on the "Devices" button in the "Laser" window on the right hand side of the main screen.

10. Next you will need to choose the "Origin" or more commonly know as Home location. This is the corner your laser traveled when you started up the machine in step 2
- If you choose the wrong location your design will engrave or cut as a mirror image of what you anticipate. Furthermore, you may experience difficulty trying to run you program as you may unexpectedly get X or Y overrun errors.
- If you don't know the correct location or you inadvertently choose the wrong location you can always edit it after the fact by clicking on the "Devices" button in the "Laser" window on the right hand side of the main screen.

12. Finally , it is very important that you save your settings files in the event something is inadvertently changed. You will use these
to restore the setting back to the original factory settings.
- In the top ribbon go to "Edit" --> "Machine Settings". You will see the popup below
- Click the "Read" button
- Click the "Save" button and save to a secure location.

Controller Setup Video Instructions
- Lightburn - Documentation
- Lightburn - Setup
- Lightburn - Adding a Laser
- Lightburn - Configuring a Laser
- Lightburn - Beginner Walkthrough
- Lightburn - Windows and Menus
- Lightburn - Using Specific Features
- Lightburn - Advanced Topics
- Lightburn - Tips and Tricks
- Lightburn - Working With Other Software
- Lightburn - Troubleshooting
Disclaimer:
I make no warranties, neither expressed nor implied, regarding the accuracy, completeness, or reliability of the information contained on this website. The content is provided for general informational purposes only and does not constitute professional advice (including but not limited to legal, medical, financial, or other expert guidance). Always consult a qualified professional for specific concerns. Any use of this website or reliance on its content is strictly at your own risk. I disclaim all liability for any damages, losses, or legal consequences arising from your use of this site. By using this website, you fully agree to indemnify and hold me harmless from any claims, liabilities, or expenses (including legal fees) resulting from your misuse of this site or violation of this disclaimer. This website may contain links to third-party sites. I am not responsible for the content, privacy practices, or accuracy of external sites.
As an Amazon associate and affiliate for OMTech, Spetool, Microjig, and all other programs, I may earn commissions from qualifying purchases. All content on this site is protected by copyright (© 2025 M. Arnio).
No part of this website may be reproduced, rewritten or distributed without prior written permission. All trademarks, logos, and company names are the property of their respective owners. This disclaimer shall be governed by and construed in accordance with the laws of Ohio, and any disputes will be subject to the exclusive jurisdiction of Ohio courts. I reserve the right to modify this disclaimer at any time. Use of this web site indicates understanding and acceptance of this statement and releases me from any, and all liability. The information above is subject to change at any time.